|
My Father's "Kappel"
By Tova Wald
My father of blessed memory wore a "kappel" – a skullcap for religious purposes. The word, of Yiddish-European origin, could be derived from the word: "kappelush," a man's hat. The kappel was sewn together from a satiny material– in several triangles – to form a round shape like a beanie. It was black or a navy blue; it fit the head entirely and came down almost to the ears. My father wore it under his hat when he went to shul and at home when he prayed or ate. Often he would remove the kappel and put it down, but he couldn't remember where. "Du hast g'zein mein kappel?" "Did you see my kappel?" He would ask my mother.
My mother from experience knew where it was. "Du eiz es." "Here it is." When no one was looking, I would put on the kappel and stand in front of the mirror. I wanted to see how I would look as a boy. I didn't look too bad even with my long ribboned pigtails hanging down. When I was about 16 years old the "knitted kippa" had already started to appear. The very nice ones are crocheted with thin thread in a variety of patterns. I decided I would try to make one. For a pattern I chose grapes twinned together, gold and green, on a blue background. The work went slowly, round by round. When it was finished I proudly gave it to my father . My father put aside his kappel and became a modern Jew with a "kippa" that his daughter lovingly had made.
One day my father came home from shul looking grim. "I lost the kippa" ; " I don't know what happened!" "Oh well…I can make another one", I sighed – which I did. Several months went by. One day, walking down the street I see an elderly man walking towards me. When he came alongside I looked at him; somehow I knew he was wearing my father's kippa!
The "kappel" disappeared with the passing of time. It was replaced by the "kippa." It's a kippa that comes in various sizes: solid color or stripped, intricately designed or just with a nice border. If you see a young woman crocheting a beautifully designed kippa most likely its for a "serious relationship."
Footnote: My father, Jack (Yankel) Wald z"l, gone now these past 25 years, reached his late 70's. As a young man he immigrated to America from Poland with his parents in the year 1929, settling in the Williamsburg section of Brooklyn. Its here where I was born. My paternal grandfather had been a "g'veer" prosperous in the "alte heim" in the old country. He had operated a factory in Warsaw making thread! It was confiscated at the time of the War, along with other property.
Tova Wald made aliya on January 13, l982, and a prophesy that was realized! After an over- night stopover in Hertzilia, she was taken to Ulpan Etzion in Baka ( the first established live-in located in Jerusalem). Today, she is a Hebrew-speaking Israeli-American; pensioner, volunteer who has been living in the East Talpiot section of Jerusalem since 1987.
======================
Easy Instructions for Making a Kippa
Instructions for crocheting a kippa with a border design:
Kippa design : You need graph paper which you can get at a stationary store (n’yar m’shubatzim in Hebrew) . Using different colors, mark O’s and X’s in the little boxes for your design leaving those boxes blank of the background. If you like, you can copy something that already exists. You have to count all squares, including the unfilled blanks, designated for the design, making sure they are divisible into the number of stitches of the final row of the kippa before you do the border. Take into account also how many rows the design will take. As a beginner, make the design simple .
Basics: For the beginner, use a larger needle and thicker thread. The needle comes in different sizes. The smallest is used by experienced kippa makers in proportion to the thin thread used. Don’t use more than 2 colors. After you gain experience you can add more if you want.
When adding on a new color, tie it on loosely to the first thread. WORK IT OVER the first which becomes interwoven behind the work. Work evenly. The hook should move nicely in and out of the stitch. If you feel the stitch has not been done properly, rip it and redo.

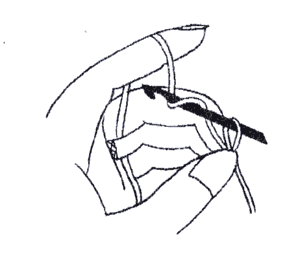
Stitches should be worked close to each other. Your thumb and forefinger holds and supports the work close to the hook itself, not behind it. This is true also for the loop on the hook. But not too close to the tip which may cause the loop to slip off. If it does happen, you can usually just put the loop back on the hook. If you lose it, you have to rip to the stitch before and continue. Avoid skipping a stitch. . Check your work constantly. If you find you have skipped, rip up to that point , make the stitch and go on . As the kippa gets bigger you increase less. You have to keep the kippa flat. If you have increased too much at some point, it will create ridges or waves
To Begin the Kippa:
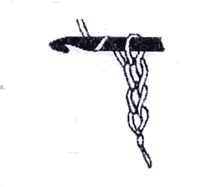
Crochet 4 chains. Make a circle. You put the hook into the first chain made drawing through the thread and at the same time the single chain stitch on the hook. The result is a little circle and a new chain stitch on the needle.

Put the hook into the circle, catch the thread and pull through . There is now the pulled through thread and the chain stitch (2) on the hook. Catch again the thread – draw through the two chain stitches .
You have “worked” off two stitches and made a single crochet (SC) as shown above. Repeat five more times. You have a total of 6 single crochets. If it doesn’t look right, rip it and start again. Please note that the hook has to go under the two upper parallel threads of the stitch. On the next round you need to double the original 6 stitches.
To increase, make two single crochets in one stitch. You continue doubling for the next several rounds; check to see that it remains flat. When it starts to look a little less flat, increase less, and do so evenly. Pull gently from side to side and see how it looks. Towards the end , check the head size, and if it covers well you can begin the border. If you want a “kappel” effect, in other words a deeper kippa you should make it wider, using your judgment. Single crochet – no increasing - until it comes down to where you want.
When the kippa is finished , cut the end of the thread leaving an inch and a half (a centimeter), and finish neatly in the back; also any other loose ends that may exist. Some people when the kippa is finished wet it down and place it over the bottom of a small bowl. When it dries, it makes the round shape look better. You can make all kinds of designs, also names.
Make it with love and happy thoughts, and remember if at first you don’t
succeed… don’t give up. Good Luck!!!!!
~~~~~~~
from the January 2007 Edition of the Jewish Magazine
|


